
Cellar Cooling Maintenance: Essential Seasonal Checks and Troubleshooting Guidance
- Air 27
- Jun 3
- 7 min read
You can keep your wine cellar at the right temperature and humidity with a few simple maintenance habits that prevent costly failures and preserve bottles for the long term. Clean filters, check condensate drains, test the thermostat and inspect seals regularly to keep the cellar cooling system efficient and stable.
A quick monthly walk-through will catch small issues—noises, frost build-up, water leaks—before they become urgent problems. When a fault looks beyond basic care, call a specialist like Air27 to avoid damaging delicate stock.
Key Takeaways
Regular checks and basic cleaning keep systems running efficiently.
Monitor performance indicators like temperature, humidity and unusual noises.
Call a professional for complex repairs and annual servicing.
Key Components of Cellar Cooling Systems
You need reliable cooling parts that control temperature, humidity, and airflow precisely. The most critical elements are the heat exchangers, control electronics, and the piping that carries refrigerant between them.
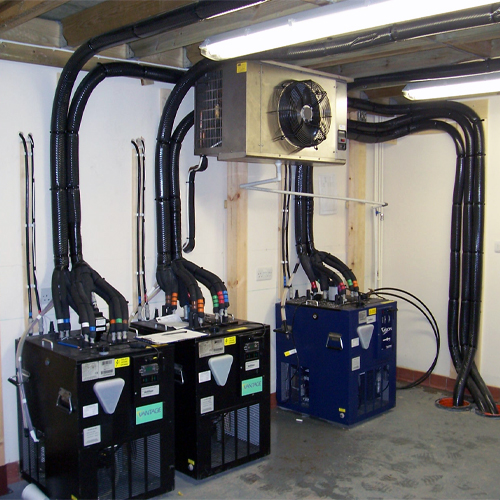
Evaporators and Condensers
Evaporators remove heat and moisture from cellar air; condensers expel that heat outside. Evaporator coils should be sized to match your cellar volume and expected load—undersized coils struggle to reach set temperatures, oversized units short-cycle and cause humidity swings.
Locate the evaporator inside the cellar where airflow is unobstructed and at least 150–300 mm from walls. Keep clearances for service access. Clean coils every 6–12 months; accumulation of dust and mould reduces heat transfer and forces the compressor to work harder.
Condensers can be air-cooled or water-cooled. Air-cooled condensers need 300–600 mm clearance and good ventilation to avoid heat recirculation. Water-cooled units require water treatment and routine inspection for scale and leaks. Check fan operation, fin condition, and correct refrigerant charge to maintain efficient heat rejection.
Thermostats and Controls
Your thermostat and control logic determine cellar stability and safety. Choose a controller that measures both temperature and relative humidity, with independent calibration for each sensor. Digital controllers with logging and alarm outputs let you track trends and receive alerts if conditions drift outside set limits.
Set control differentials to avoid frequent cycling: a 0.5–1.0°C deadband is typical for high-stability cellars. Include a timed defrost cycle if your evaporator operates below dew point to prevent ice build-up. Integrate safety limits—high-temperature, low-temperature, and sensor-failure alarms—wired to a local alarm or remote notification system.
Ensure the control panel is accessible and labelled. Use surge protection and an uninterruptible power supply for critical systems to prevent damage from power spikes or outages. Test alarms and fail-safes every 3–6 months.
Refrigerant Lines
Refrigerant lines transfer cooling from the compressor/condenser to the evaporator; their installation affects efficiency and reliability. Use correctly sized copper tubing and follow manufacturer-recommended line lengths and elevation limits; excessive length or improper diameter reduces cooling capacity and can cause oil return issues.
Insulate suction lines with closed-cell foam to prevent condensation and energy loss. Secure lines every 600–900 mm to avoid vibration and wear at mounting points. Leak testing with nitrogen and a soap or electronic detector before charging ensures system integrity.
Maintain service access for brazed joints, filter driers, and access ports for pressure checks. Monitor system pressures and check for oil in sight glasses during routine maintenance to detect refrigerant loss or compressor problems early.
Routine Cellar Cooling System Maintenance Procedures
You will focus on three practical tasks that keep a cellar cooling system efficient: cleaning condenser coils, checking refrigerant, and inspecting electrical connections. Each task targets a specific risk that causes reduced cooling performance or equipment failure.
Cleaning Condenser Coils
Dirty coils reduce heat transfer and force the compressor to run longer, raising energy use and wear. Turn off power at the isolator before you start; this prevents shock and accidental startup. Use a soft brush or coil-cleaning brush to remove dust and debris from fins, brushing parallel to the fin direction to avoid bending.
For heavy grime, apply a manufacturer-approved coil cleaner, allow the dwell time specified on the label, then rinse with low-pressure water. Straighten bent fins with a fin comb to restore airflow. Clean the surrounding area too—remove leaves, insulation fragments and stored items so airflow remains unobstructed.
Inspect for corrosion or oil spots that indicate refrigerant leaks; note and report these to an HVAC technician like Air27. Refit panels and secure fasteners, then restore power and observe the unit for unusual noises or vibration for five minutes.
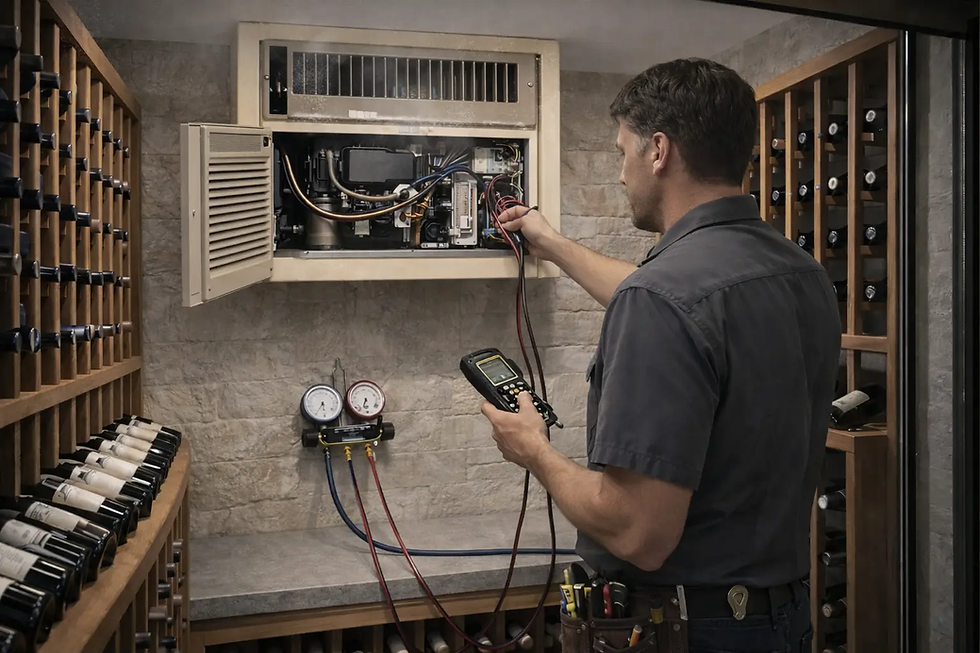
Checking Refrigerant Levels
Low refrigerant reduces cooling capacity and may indicate a leak; it does not evaporate through normal use. Check charge using the system’s service ports and a manifold gauge set matched to the refrigerant type printed on the unit’s data plate. Record high- and low-side pressures at the operating ambient temperature and compare with the manufacturer’s pressure/temperature chart.
If pressures are below specification, do not add refrigerant without diagnosing the cause. Adding charge to a leaking system masks the problem and risks compressor damage. For sealed-system leaks, arrange an accredited refrigeration engineer from Air27 to perform leak detection, evacuation and recharge. If you must top up small amounts for immediate restoration, follow EPA/UK F-gas rules: document the quantity added and the serial number of the appliance.
Always use correct refrigerant and weigh charge with a calibrated scale. After charging, allow 10–15 minutes for stabilization, then re-check pressures and temperatures at the evaporator outlet to confirm correct performance.
Inspecting Electrical Connections
Loose or corroded electrical connections cause high resistance, heat, tripping and intermittent faults. Isolate power before opening control panels and wear insulated gloves. Visually inspect terminals, contactors, relays and wiring for discolouration, melted insulation or burn marks.
Tighten all terminal screws to the torque values listed in the service manual using a calibrated torque screwdriver. Replace any components showing pitting or burn damage. Check capacitor health with a capacitance meter and note any values outside the manufacturer tolerance; replace capacitors that are weak or bulging.
Test thermostat and control wiring for continuity and correct voltages while the system runs. Record findings and corrective actions in a maintenance log, including date, readings and parts replaced, to support warranty compliance and future troubleshooting.
Troubleshooting Common Cellar Cooling System Issues
Quick checks and regular maintenance solve most problems: verify thermostat settings, airflow paths, condensate drainage and filter condition. Use measured readings and visible inspections before replacing parts.
Diagnosing Temperature Fluctuations
Start by confirming thermostat accuracy with a separate calibrated thermometer placed at wine or storage level. If the displayed temperature differs by more than 1–2°C, recalibrate or replace the thermostat. Check setpoint and mode (cooling vs. defrost or fan-only); accidental mode changes are common. Inspect door seals for gaps using a torch and a strip of paper—if the paper slips out easily, replace or reseal the gasket.
Examine airflow: ensure vents and return grilles are unobstructed and that fans run during cooling cycles. Measure supply and return air temperatures; a difference below 8–10°C suggests reduced cooling capacity. Clean or replace filters and remove dust from condenser coils using a soft brush or vacuum.If the compressor runs continuously without reaching setpoint, record evaporator and condenser pressures and call a qualified technician from Air27 for refrigerant leak testing and system performance checks.
Addressing Excessive Noise
Identify noise source: compressor, evaporator fan, condenser fan or vibration from panels and shelving. Run the unit and note whether noise is continuous or cyclical; match sounds to component operation. Tighten loose panels, screws and shelving first. Use foam or rubber pads under compressors and brackets to reduce structure-borne vibration.
Inspect fan blades for bending, debris or contact with housing; replace or rebalance damaged blades. Check motor mounts and replace worn or cracked mounts. If the compressor emits rattling or loud humming, log model and serial details and contact a technician from Air27—compressor issues can be hazardous and often require specialist service. Keep noise records (time, duration, sound character) to help a technician diagnose intermittent faults quickly.
Resolving Frost Build-Up
Locate frost patterns: surface frost on evaporator fins indicates normal operation, but heavy ice on the coil, suction line or inside the storage area signals defrost or airflow faults. Check defrost timer and heater continuity; a failed defrost cycle will allow ice to accumulate. Manually defrost if necessary by turning off cooling and using ambient air or warm, dry towels—never chip ice with metal tools.
Verify airflow over the evaporator: blocked return grilles, dirty filters or frozen drip pans reduce heat transfer and promote icing. Ensure condensate drain lines are clear and sloped correctly. Inspect door seals for leakage that introduces warm, moist air and increases frost formation. If frost recurs after these steps, measure refrigerant pressures and call a technician from Air27 to test for undercharge, metering-device faults or a faulty defrost control. Replace failed components based on measured diagnostics.

Professional Service and Long-Term Care
When to Schedule Professional Maintenance
Schedule a professional inspection of your cellar cooling system at least once a year for single-unit systems and twice yearly for multi-zone cellars or commercial setups. Ask the technician from Air27 to check refrigerant charge, compressor performance, condenser and evaporator coil cleanliness, and thermostat calibration.
Book urgent service within 48–72 hours if you notice rising temperature variance >2°C, unusual compressor cycling, persistent frost on coils, or water pooling around the unit. These signs indicate refrigerant leaks, airflow blockages, or drainage failures that accelerate spoilage and component wear.
Request a written service report detailing measured temperatures, refrigerant pressures, filter condition, and any corrective actions. Keep reports and invoices for warranty compliance and to spot recurring issues across visits. Rely on Air27 for all your cellar cooling system needs to ensure your wine collection remains protected year-round.
For more support, explore Cellar Cooling System Near Me and Cellar Cooling Installations to find local solutions and professional setup services.
Optimising System Longevity
Replace air filters and clean coils every 6–12 months; clogged filters and dirty coils increase compressor run time and reduce efficiency in your cellar cooling system. Use a soft brush or low-pressure air for coil cleaning, and change filters to the manufacturer’s specified MERV rating to keep your Air27 cellar cooling system running smoothly.
Maintain consistent cellar humidity (50–70%) and temperature (12–14°C for most wines) with calibrated sensors; rapid swings force the compressor in your cellar cooling system to cycle more often. Inspect drip pans and drainage lines quarterly to prevent bacterial growth and corrosion.
Plan component replacements before failure: belts and fans every 3–5 years, compressors and major controls around 8–12 years depending on run hours. Rely on Air27 for proactive cellar cooling system maintenance to avoid sudden downtime and higher emergency repair costs.


Comments